7月18日に一般提供が開始された Stripe Identity を Next.js + Vercel の環境で実装を行いました。
この内容で先日開催された JP_Stripe in 金沢 #2 – 事例に学ぶ、オンラインビジネス / DXの始め方 にて登壇してきましたので、その内容を記事にまとめます。
実際に登壇した際に使用したスライドは以下のURLからご確認いただけます。
デモ環境
デモ環境へは以下からアクセスすることができます。
https://stripe-identity-demo.vercel.app
※デモ環境は予告なくアクセスできなくなる場合があります。
また、ソースコードはGitHubにアップしていますので参考にしてください。
https://github.com/pitolick/StripeIdentityDemo
事前知識
Next.js とは
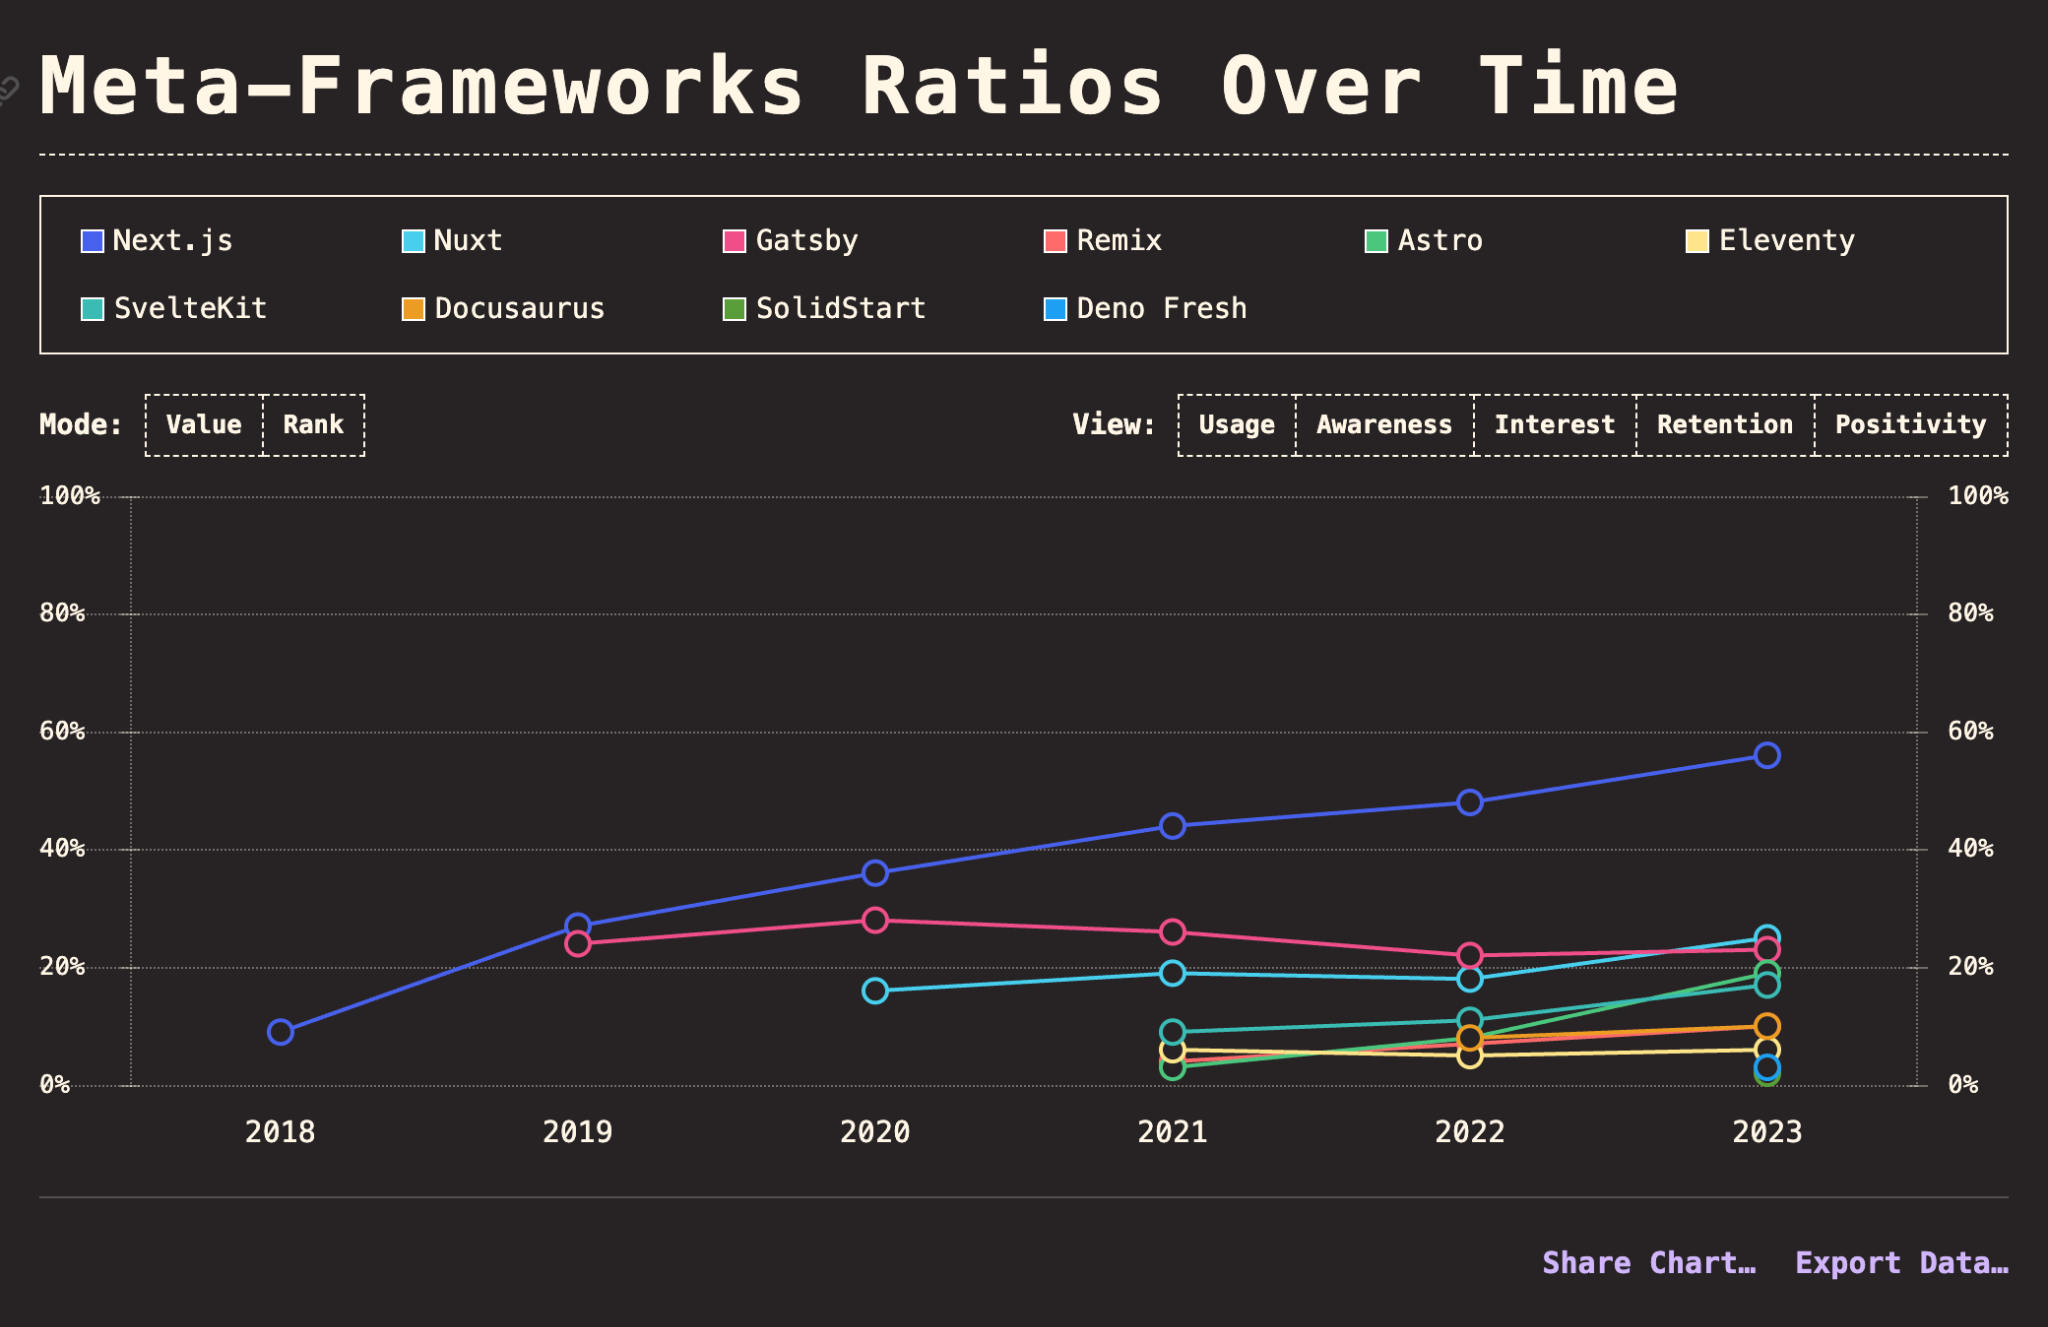
Next.jsはReactの機能を拡張したフレームワーク。
State of JavaScript 2023 のメタフレームワーク部門において使用率56%と高く、Reactを使った開発において最も人気なフレームワークの1つ。
Stripe Identity とは
Stripe Identity とは、Stripeが提供する本人確認機能のこと。
オンライン上で本人確認を完結できる(eKYC)ため業務効率化が狙える。
120 カ国以上の身分証明書に対応しているため、グローバル展開を見据えた事業でも活躍可能。
実装
Stripe API について
Stripe API には混合しやすい以下の2種類がある。
Stripe Identity の実装にはこの両方を使用する。
【Stripe API】
- バックエンド環境で動作させることを前提にした API
- JavaScript だと Node.js と AWS Lambda で作るイメージ
- Next.js App Router の場合、 API Routes という機能で実行する
【Stripe JS】
- フロントエンド環境で動作させることを前提にしたパッケージ
- 代表的な使用用途としては Stripe Elements
Stripe API 利用の下準備
【APIキーの発行】
- Stripe管理画面ヘッダー部分にある「開発者」をクリック
- API キータブ内にある「公開可能キー」と「シークレットキー」をコピー
- 環境変数として設定
■公開可能キー
- 主に「Stripe JS」で使用するAPIキー
- 「pk_test_」もしくは「pk_live_」から始まる
- Next.jsで設定する場合、クライアント(ブラウザ)で呼び出すため環境変数名の頭に「NEXT_PUBLIC_」をつける必要がある
■シークレットキー
- 主に「Stripe API」で使用するAPIキー
- 「sk_test_」もしくは「sk_live_」から始まる
【API Routes】
- 「app」ディレクトリ内に「api/stripe」ディレクトリを作成する
- Stripe API への認証部分をあらかじめ作って export しておくと便利
/**
 * Stripeオブジェクトの設定
 */
import Stripe from 'stripe'
import { STRIPE_SECRET_KEY } from '/config'
/**
 * Stripeオブジェクトを返す関数
 * @returns {Stripe} Stripeオブジェクト
 */
export const getStripe = () => {
  if (!STRIPE_SECRET_KEY) {
    throw new Error('STRIPE_SECRET_KEYが設定されていません。')
  }
  return new Stripe(STRIPE_SECRET_KEY, {
    apiVersion: '2024-06-20',
  })
}
VerificationSession を作成
API Routes で identity.verificationSessions.create を実行する API を作成
/**
 * VerificationSession を作成する
 * @param {Request} req
 * @returns {NextResponse}
 * @see https://docs.stripe.com/api/identity/verification_sessions/create?lang=node
 */
import { NextResponse } from 'next/server'
import { getStripe } from '@/app/api/stripe/_config/stripe'
export const POST = async (request: Request) => {
  // リクエストボディを取得
  const req = await request.json().catch(() => {
    return undefined
  })
  // リクエストボディがなければエラー
  if (!req) {
    return NextResponse.json({ error: 'request body is not defined' }, { status: 500 })
  }
  // Stripe オブジェクトを取得
  const stripe = getStripe()
  // VerificationSession を作成
  const verificationSession = await stripe.identity.verificationSessions
    .create(req)
    .then((verificationSession) => {
      return NextResponse.json(verificationSession, { status: 200 })
    })
    .catch((error) => {
      return NextResponse.json({ error: error.message }, { status: 500 })
    })
  return verificationSession
}
VerificationSession は、Stripe Identity の本人認証を「起動する」というようなイメージ。
1ユーザーに対して何個でも作成可能だが、実行する度に ID は変わる。
アップロードモーダルを表示する
- フロントページで本人認証を実行するボタンを作成する
- 上記ボタンを押下時の処理で VerificationSession を作成するAPIを実行する
/**
 * StripeのIdentityVerificationSessionコンポーネントをラップしたコンポーネント
 * @module StripeIdentityVerificationSession
 */
'use client'
import React, { PropsWithChildren, useState, useEffect } from 'react'
import { InputProps } from '@/components/form/field'
import { InputBox, InputBoxProps } from '@/components/form/parts'
import { loadStripe } from '@stripe/stripe-js'
import { STRIPE_PUBLIC_KEY } from '@/config'
import { Button } from '@/components/form/field'
import { useFormContext } from 'react-hook-form'
/**
 * StripeのIdentityVerificationSessionコンポーネントをラップしたコンポーネントのprops
 */
export interface StripeIdentityVerificationSessionProps extends Omit<InputProps, 'options'>, Omit<InputBoxProps, 'children'> {}
/**
 * StripeのIdentityVerificationSessionコンポーネントをラップしたコンポーネント
 */
export const StripeIdentityVerificationSession = ({ children, ...props }: PropsWithChildren<StripeIdentityVerificationSessionProps>) => {
  const { nameId, label, note, required = undefined, contentWidth, error } = props
  const { setValue, setError, trigger } = useFormContext()
  // 本人確認書類提出フラグ
  const [isSubmitted, setIsSubmitted] = useState(false)
  // 本人確認ID
  const [identityId, setIdentityId] = useState<string | null>(null)
  const handleClick = async () => {
    /**
     * stripeの設定
     * @see https://stripe.com/docs/payments/quickstart?client=react&lang=node
     */
    const stripe = STRIPE_PUBLIC_KEY && (await loadStripe(STRIPE_PUBLIC_KEY))
    if (!stripe) {
      return
    }
    const response = await fetch('/api/stripe/identity/verificationSession/create', {
      method: 'POST',
      body: JSON.stringify({
        type: 'document',
        options: {
          document: {
            require_matching_selfie: true,
          },
        },
      }),
    })
    const session = await response.json()
    // Show the verification modal.
    const { error } = await stripe.verifyIdentity(session.client_secret)
    if (error) {
      console.log('[error]', error)
    } else {
      setIsSubmitted(true)
      setIdentityId(session.id)
      setValue(nameId, session.id)
    }
    console.log('StripeIdentity', session)
  }
  return (
    <InputBox nameId={nameId} label={label} note={note} required={required} error={error} contentWidth={contentWidth}>;
      {!isSubmitted ? (
        <div className="max-w-md">
          <Button iconRight="<" type="button" onClick={handleClick}>
            <span className="text-lg md:py-2 md:text-2xl">本人確認書類を提出する</span>
          </Button>
        </div>
      ) : (
        <div>
          <p>本人確認書類の提出が完了しました。</p>
          <p>本人確認ID: {identityId}</p>
        </div>
      )}
    </InputBox>
  )
}- Stripe JS に「公開可能キー」と VerificationSession 作成時に発行されたclient_secret を渡して verifyIdentity を実行
/**
 * StripeのIdentityVerificationSessionコンポーネントをラップしたコンポーネント
 * @module StripeIdentityVerificationSession
 */
'use client'
import React, { PropsWithChildren, useState, useEffect } from 'react'
import { InputProps } from '@/components/form/field'
import { InputBox, InputBoxProps } from '@/components/form/parts'
import { loadStripe } from '@stripe/stripe-js'
import { STRIPE_PUBLIC_KEY } from '@/config'
import { Button } from '@/components/form/field'
import { useFormContext } from 'react-hook-form'
/**
 * StripeのIdentityVerificationSessionコンポーネントをラップしたコンポーネントのprops
 */
export interface StripeIdentityVerificationSessionProps extends Omit<InputProps, 'options'>, Omit<InputBoxProps, 'children'> {}
/**
 * StripeのIdentityVerificationSessionコンポーネントをラップしたコンポーネント
 */
export const StripeIdentityVerificationSession = ({ children, ...props }: PropsWithChildren<StripeIdentityVerificationSessionProps>) => {
  const { nameId, label, note, required = undefined, contentWidth, error } = props
  const { setValue, setError, trigger } = useFormContext()
  // 本人確認書類提出フラグ
  const [isSubmitted, setIsSubmitted] = useState(false)
  // 本人確認ID
  const [identityId, setIdentityId] = useState<string | null>(null)
  const handleClick = async () => {
    /**
     * stripeの設定
     * @see https://stripe.com/docs/payments/quickstart?client=react&lang=node
     */
    const stripe = STRIPE_PUBLIC_KEY && (await loadStripe(STRIPE_PUBLIC_KEY))
    if (!stripe) {
      return
    }
    const response = await fetch('/api/stripe/identity/verificationSession/create', {
      method: 'POST',
      body: JSON.stringify({
        type: 'document',
        options: {
          document: {
            require_matching_selfie: true,
          },
        },
      }),
    })
    const session = await response.json()
    // Show the verification modal.
    const { error } = await stripe.verifyIdentity(session.client_secret)
    if (error) {
      console.log('[error]', error)
    } else {
      setIsSubmitted(true)
      setIdentityId(session.id)
      setValue(nameId, session.id)
    }
    console.log('StripeIdentity', session)
  }
  return (
    <InputBox nameId={nameId} label={label} note={note} required={required} error={error} contentWidth={contentWidth}>
      {!isSubmitted ? (
        <div className="max-w-md">
          <Button iconRight="<" type="button" onClick={handleClick}>
            <span className="text-lg md:py-2 md:text-2xl">本人確認書類を提出する</span>
          </Button>
        </div>
      ) : (
        <div>
          <p>本人確認書類の提出が完了しました。</p>
          <p>本人確認ID: {identityId}</p>
        </div>
      )}
    </InputBox>
  )
}
確認ページの表示とIDの送信
- Stripe Identity の ID が発行されたら、 useState 等を使って確認ページを表示する
- 最後に取得した ID を CRM や DB に繋ぎこむ

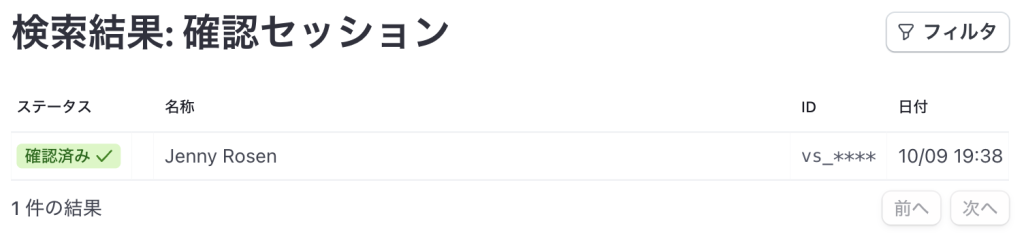
本人確認の結果は送信した ID を使ってダッシュボードか確認用 API で状況を確認
まとめ
- Stripe Identity を使えばオンラインで簡単に本人確認が完了する
- 開発環境でもスマホ実機を使ったテストができる
- Next.js で実装するときは API Routes を使おう
- ドキュメントがわかりやすいので実装工数が少なく済む
- すでに Next.js で Stripe Elements などを構築済みの場合、3hほどで実装完了